Sea glass for Christmas

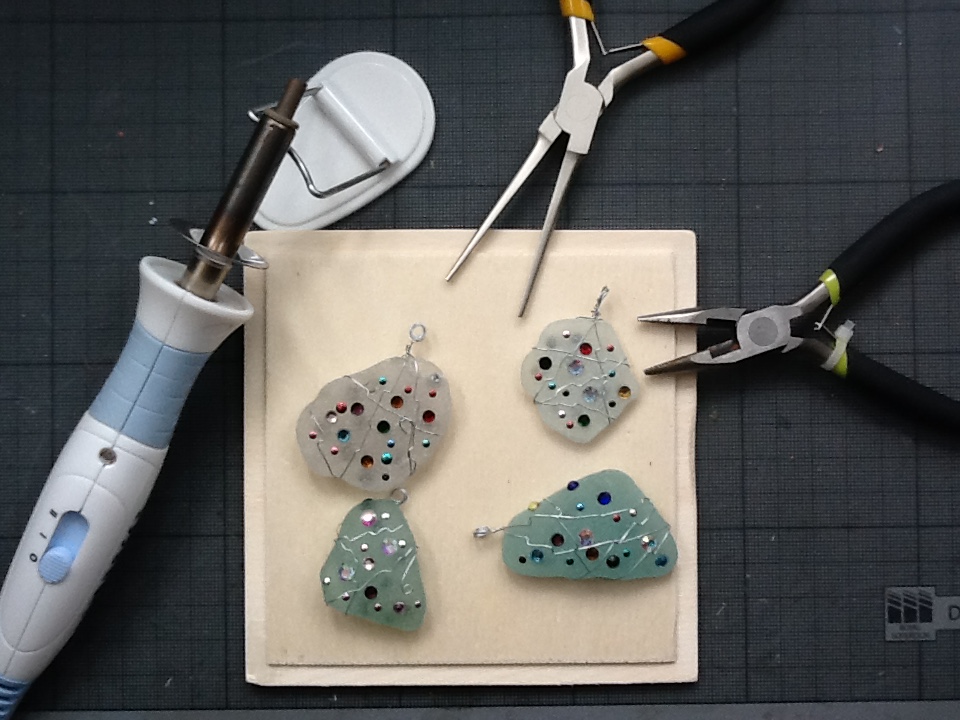
wire wrap a piece of sea glass, hot fix  stones for extra bling and we have a set of tree baubles …

image

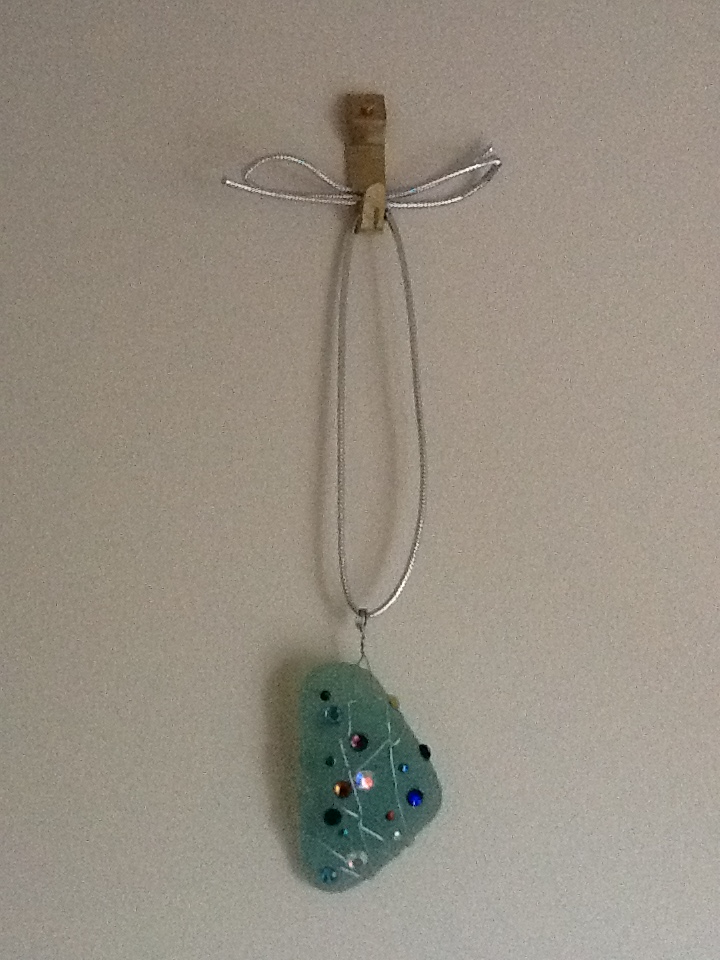
How to: select a flat piece of weathered glass and cut about thirty centimetres of beading wire. Wind the mid point of the wire around the end of some long nosed pliers (or a pencil) four times to create a loop then twist the wire under the loop to fix it.  Wrap the tails of the wire around the front and back of the glass overlapping and going north south east and west until the wire runs out. Tweak the wires with pliers to tighten them around the glass and tuck the loose ends under any crossovers or back around the top loop. Taking care with the hot fix took stick sparkly bits front and back as you choose then tie a length of ribbon so your lovely bauble can hang from the tree!

image

Noughts and Crosses

imageSuch fun constructing this. I hope the recipients have as much fun playing with it.

how to: draw four evenly spaced lines with an erasable pen to form the nine squares then zig zag stitch over the lines in contrast thread. My grid boxes are about 2 inches square. Piece  a frame in contrast fabric around the grid by sewing two matching sides then a top and finish with a deep bottom to the frame. I made a simple pocket in a third fabric by hemming the open top then pinning in place. Cut a back and piece of wadding. Lay a ribbon (little loop side out -and strings pinned away from the edge) on top of the finished front, then the back face down on top then the wadding and stitch around taking care to catch the pocket, leave enough of a gap to turn. Once turned top stitch all the way round the edge , which also seals the turning gap. Counters are cut from squares of felt, five of each and can stored in the pocket.

Baubles card

Inspired by  last December’s Homemaker magazine I made this bauble card.

image

For the next one I used embroidery thread rather than twine and was more controlled with the glitter

image

how to: cut three circles of the same size for each bauble then score in half. I used three and two inch circles. Stick halves together to form half a ball which is then stuck over thread I n place. A pelmet to hide the string top and a stamped message to finish

image

(Don’t) Shut that door

imageA pile of fabric bits, a Christmas list to make for and a ramble on YouTube produces more doorstop ideas, but the styling is due mainly to Debbie Shore’s post.

I have decided to stuff mine with whatever is to hand rather than buy specifically so for these I used gravel from the garden or salt put in ziplock plastic bags.  These  give a nice crackly noise to the project.

I have a feeling that these house doorstops are going to evolve as they are quick and fun.

How to: two squares of fabric the same size – mine 8 inches, two pieces for the roof which are the same width but not so tall. On the roof pieces draw a line 1 inch in from either end of the top out and down to the edge to make the roof angle.

sew on door, window and flower shapes to the front panel, centre them more than seems logical. If you want a chimney, take 2 small rectangles sew three sides and turn then pin facing downwards on a roof line

Sew each roof to its panel then right sides together sew all around the edges leaving a gap for turning. Box the corners before you do turn. *Stuff with old pillows and weighted bag. Hand stitch the stuffing hole closed.

to embellish further you can hot glue ribbon or ric rac on the gutter line between house and roof and add yo-yo or Suffolk puff flowers at the stage.

*boxing-  used in bag making mainly – means pin  the bottom and side seams facing to form a pointed corner at each end. Mark , pin and sew equal sized lines to form a triangle which you then snip off. OK I will do a proper explanation soon.

Wine glass lampshade

imagea little bit of geometry from wiki how and some pretty paper, add a charity shop glass with a battery tea light and another creation is finished!

Paper choice dictates the look – which here is a bit twee, but I can foresee a production line being created with i.e. music paper for different decor styles as gifts

image

First the cutting: on the reverse of an A4 sheet of patterned paper mark 2/3rds along the bottom long side(x). Draw a dotted line 110 degrees up. Set circle cutter (or compass) to double the diameter of your glass- mine typically 7cm – so circle cutter set to 14cm. With x as the centre of the circle, make the first arc from dotted line to base of paper. Next set the circle cutter or compass to the height of shade you want – mine 32 cm – and cut the second arc from dotted line to base again. Cut out your shape as shown above.

Stick the cone into shade shape with double sided tape then embellish or not as you choose

image