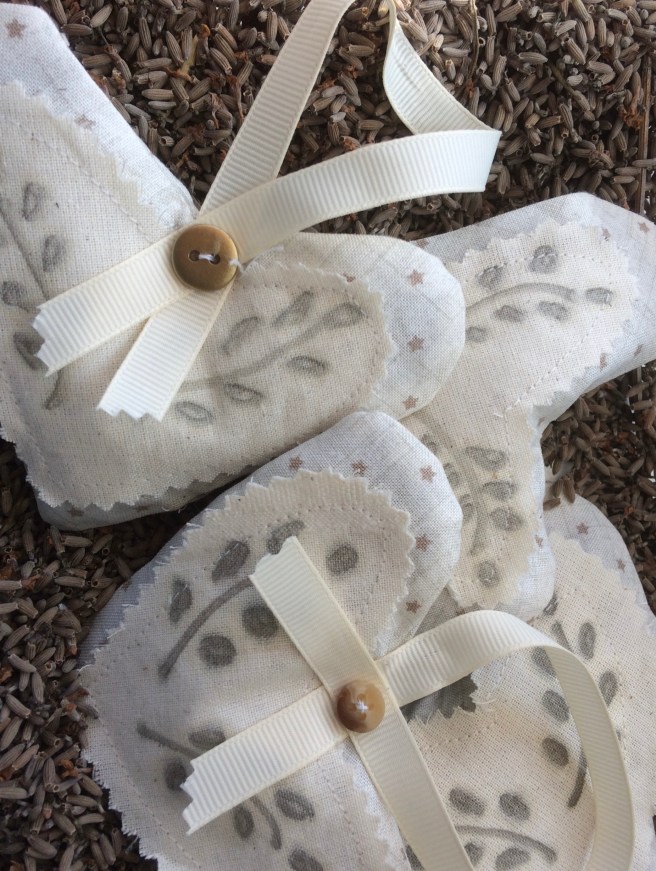
I am determined to use up some of the fabric heap. So lavender bags makes a little (very little) dent …
heart templates hand drawn as half heart on paper before pinning to plain (smaller heart) and patterned fabric. I cut the smaller heart out with pinking shears and then sketched a design on with a gold sharpie before sewing it on a bigger heart
simple machine sewing of two large hearts right sides together before turning right side out, stuffing with dried lavender then hand stitching an odd button and some offcuts of ribbon on for hanging
when the lavender is finished I plan to make some in Christmas colours scented with cinnamon and cloves, well one day
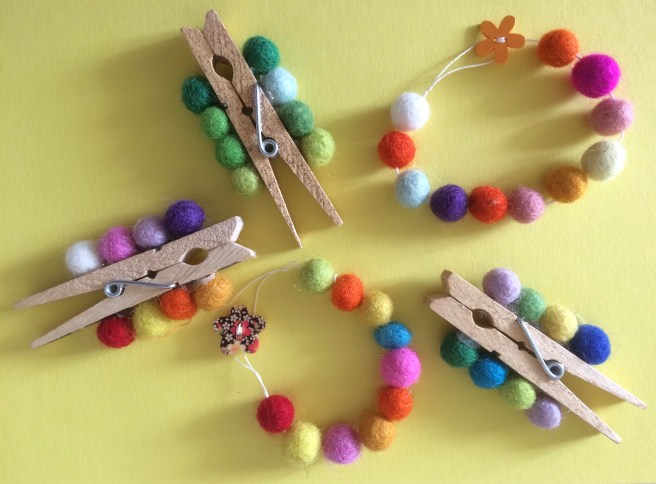
I ordered a bag of wool felted balls to try and expand my use of essential oils.
To make a car scenter that will clip on an air vent- hot glue four 1cm balls on either side of a wooden clothes peg. Positioning as I did, leaving tip and base of the peg free, is the most practical.
Drip on essential oil or perfume and clip in place. Top up when you think the scent has dissipated.
To make a bracelet style scenter that will hook around the rear view mirror or clothes hangers in a wardrobe –
Take about 60cm or 24 inches of strong cotton and fold it in half. Double knot about 3cm or an inch in from the folded end to make a loop as shown on the left of the pictures above.
Thread both strands of cotton through your needle and then thread through the balls. I used 10 per bracelet. Finish by threading on a button and secure it well before cutting off any spare tails of thread.
When ready to use drop on chosen essential oil and hook button through the loop.
four standard c5 office envelopes, a trimmer, double sided tape, decorative washi tape and paper from the stash. This project takes as little or as much time as you have…
Being challenged on the spacial awareness front I had to follow a you tube tutorial called coupon/receipt organiser by JustaFewDesigns
I added a couple of magnets and omitted her mini binder clip element but to decorate I just grabbed a pack of paper
and my stash of washi tape, and kept going until I felt enough was enough.
I stuck the magnets with glue dots and covered them with paper hexagons but am not sure it works too well, or is necessary.
This will hold gift vouchers, coupons and loyalty cards in my bag. Wonder how long it will hold together…
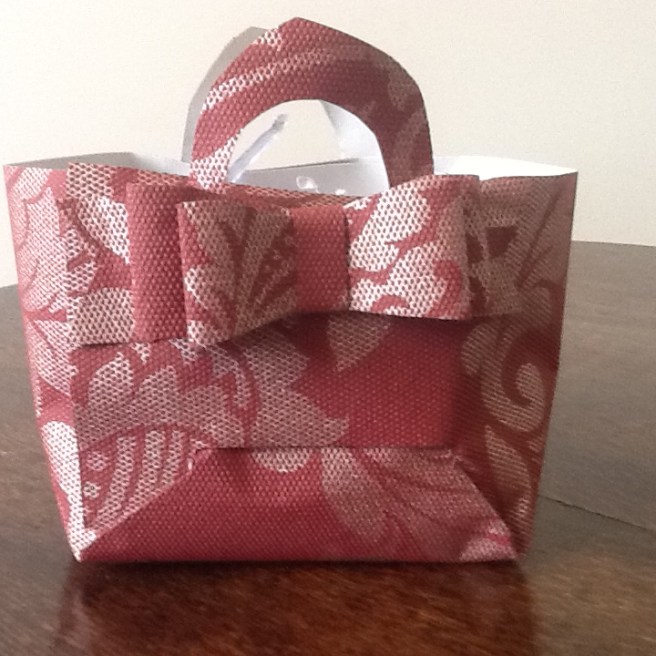
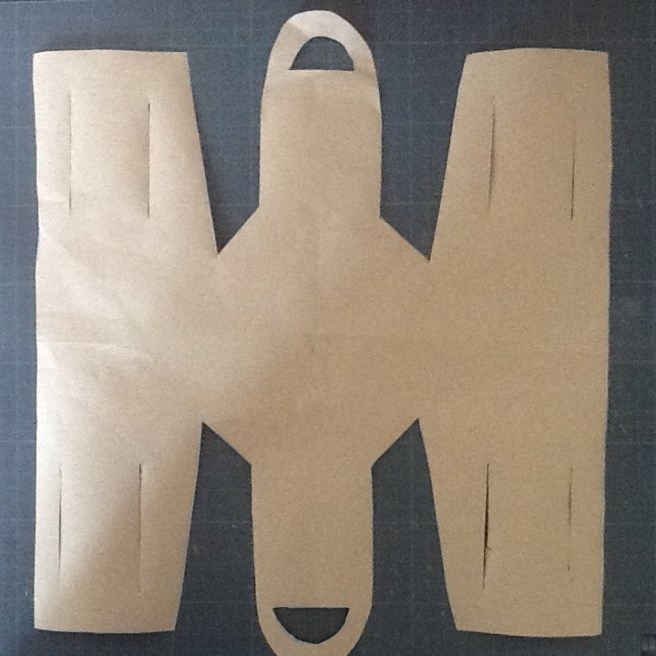
Exacto knife and paper is all you need to make a quick, cute and quite strong gift bag…
The pattern for this came from ohappyday.com where they are intended as brown paper picnic snack bags but they are far too cute to stay in brown paper.
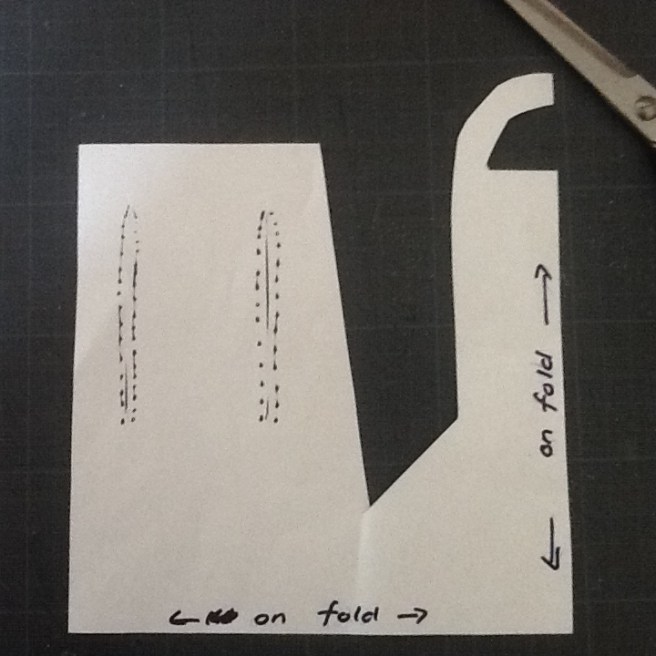
I started by downloading the template from the diy picnic basket post. It makes a quarter of the template needed so should be placed on a larger piece of paper folded in four to get the whole template. You can just cut round the folded paper with an exacto knife. Or you could follow their instruction to rotate and trace the template, but I found that a longer process.
I decided to trace mine on some wallpaper remnants – only 50pence in the end of line box at B&Q. This made for an even stronger bag and handle than a brown paper version.
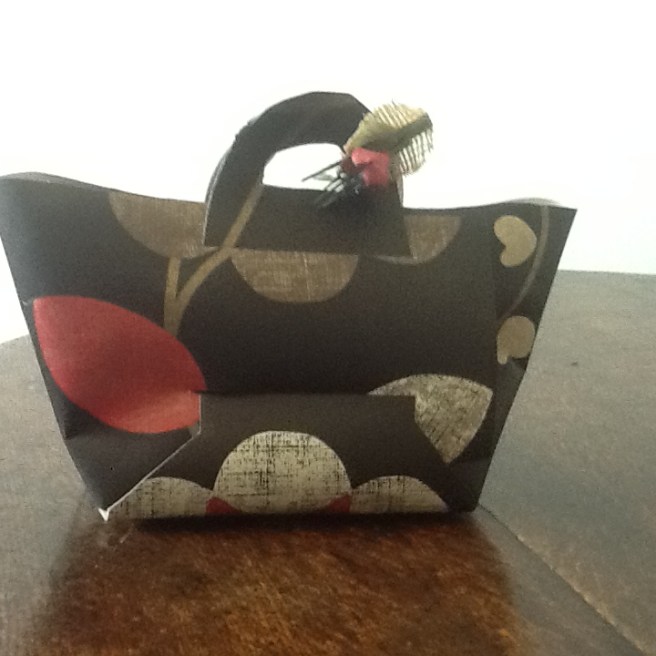
Once the shape is cut, the side flaps are folded in and round and the handles are just threaded through the slits in the flap and the bag pulls together. So satisfying.
I couldn’t resist embellishing with a cheater’s ribbon made from three strips of the paper scraps – yes this was taped together and stuck on the bag. But tags tied around the handle would look good too.
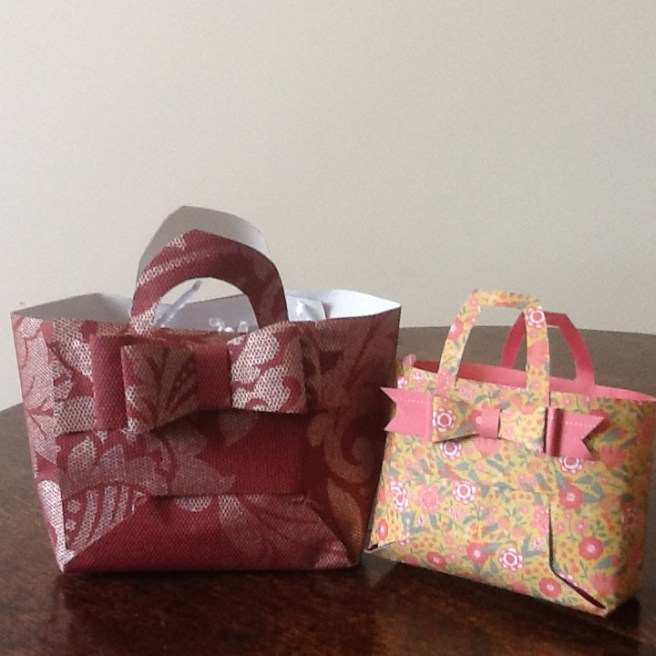
The first bag was filled with shredded paper, the second one had its handles clipped together with a mini peg which pushed out the sides to make more of a handbag shape. Oh this is addictive.
Buoyed by success I then scaled the template down to make a mini bag from a piece of unloved 12”x12” paper.
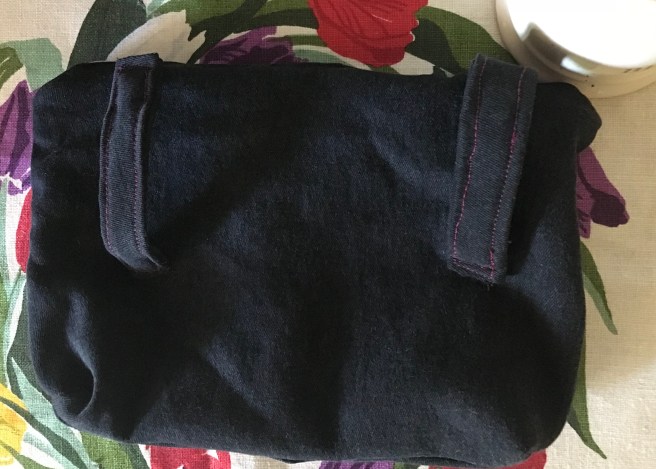
There has to be a better name for this type of bag than ‘bum bag’ or ‘fanny pack’. It is the type that you thread on your belt as a hands free pouch. I am going to call it a Harvey pouch as it is big enough for my dog (Harvey) lead, treats, poo bags, my phone and more.
Materials: I cut a rectangle around the back pocket of some old jeans and a matching rectangle from the leg material plus two strips each three inches wide and about four inches long (to make the belt loops)
I then cut two rectangles from lining material (old duvet, I am being so economic) and a small rectangle to make an inside pocket, then I found a zip the same length as the width of my rectangles – although I could have chopped a longer one down or made a shorter one longer by adding tabs.
To assemble: make the belt loops by folding in the short ends of a strip, then folding it lengthwise in half and finally folding the long edges into the centre before sewing all the way round the edge of your thin layered strip. Repeat for the other strip then position both on the outer one of the denim rectangles.
I want the jeans pocket with its stud and pattern to be on the front of my bag when it is on the belt so sewed my loops on the plain rectangle that I cut from the leg material. I positioned them nearer the top than the bottom and tried to make them equidistant from the edges, bearing in mind the seam allowance I planned
The loops were tough to sew on the panel, so many layers of denim . Should have used my walking foot.
I then made the pocket for inside by folding under the raw edges of my pocket piece and top stitching the top edge, then seaming the three other sides to one of my lining pieces. I positioned the pocket it slightly lower down the panel to keep it out of the way of the zip I was planning. I also ran a seam down the centre of the pocket to make two compartments, each big enough for credit cards.
The zip was sewn, sandwiched between the right sides of an outer and lining rectangle on each side and top stitched before opening out the pieces with lining right sides facing on the left, outer right sides facing on the right and I sewed all the way around leaving a turning gap (yes I remembered to open the zip 3/4s of the way first). I boxed the corners of lining and outer to give the pouch a bit of shape before turning, finishing the lining then flipping the lining inside.
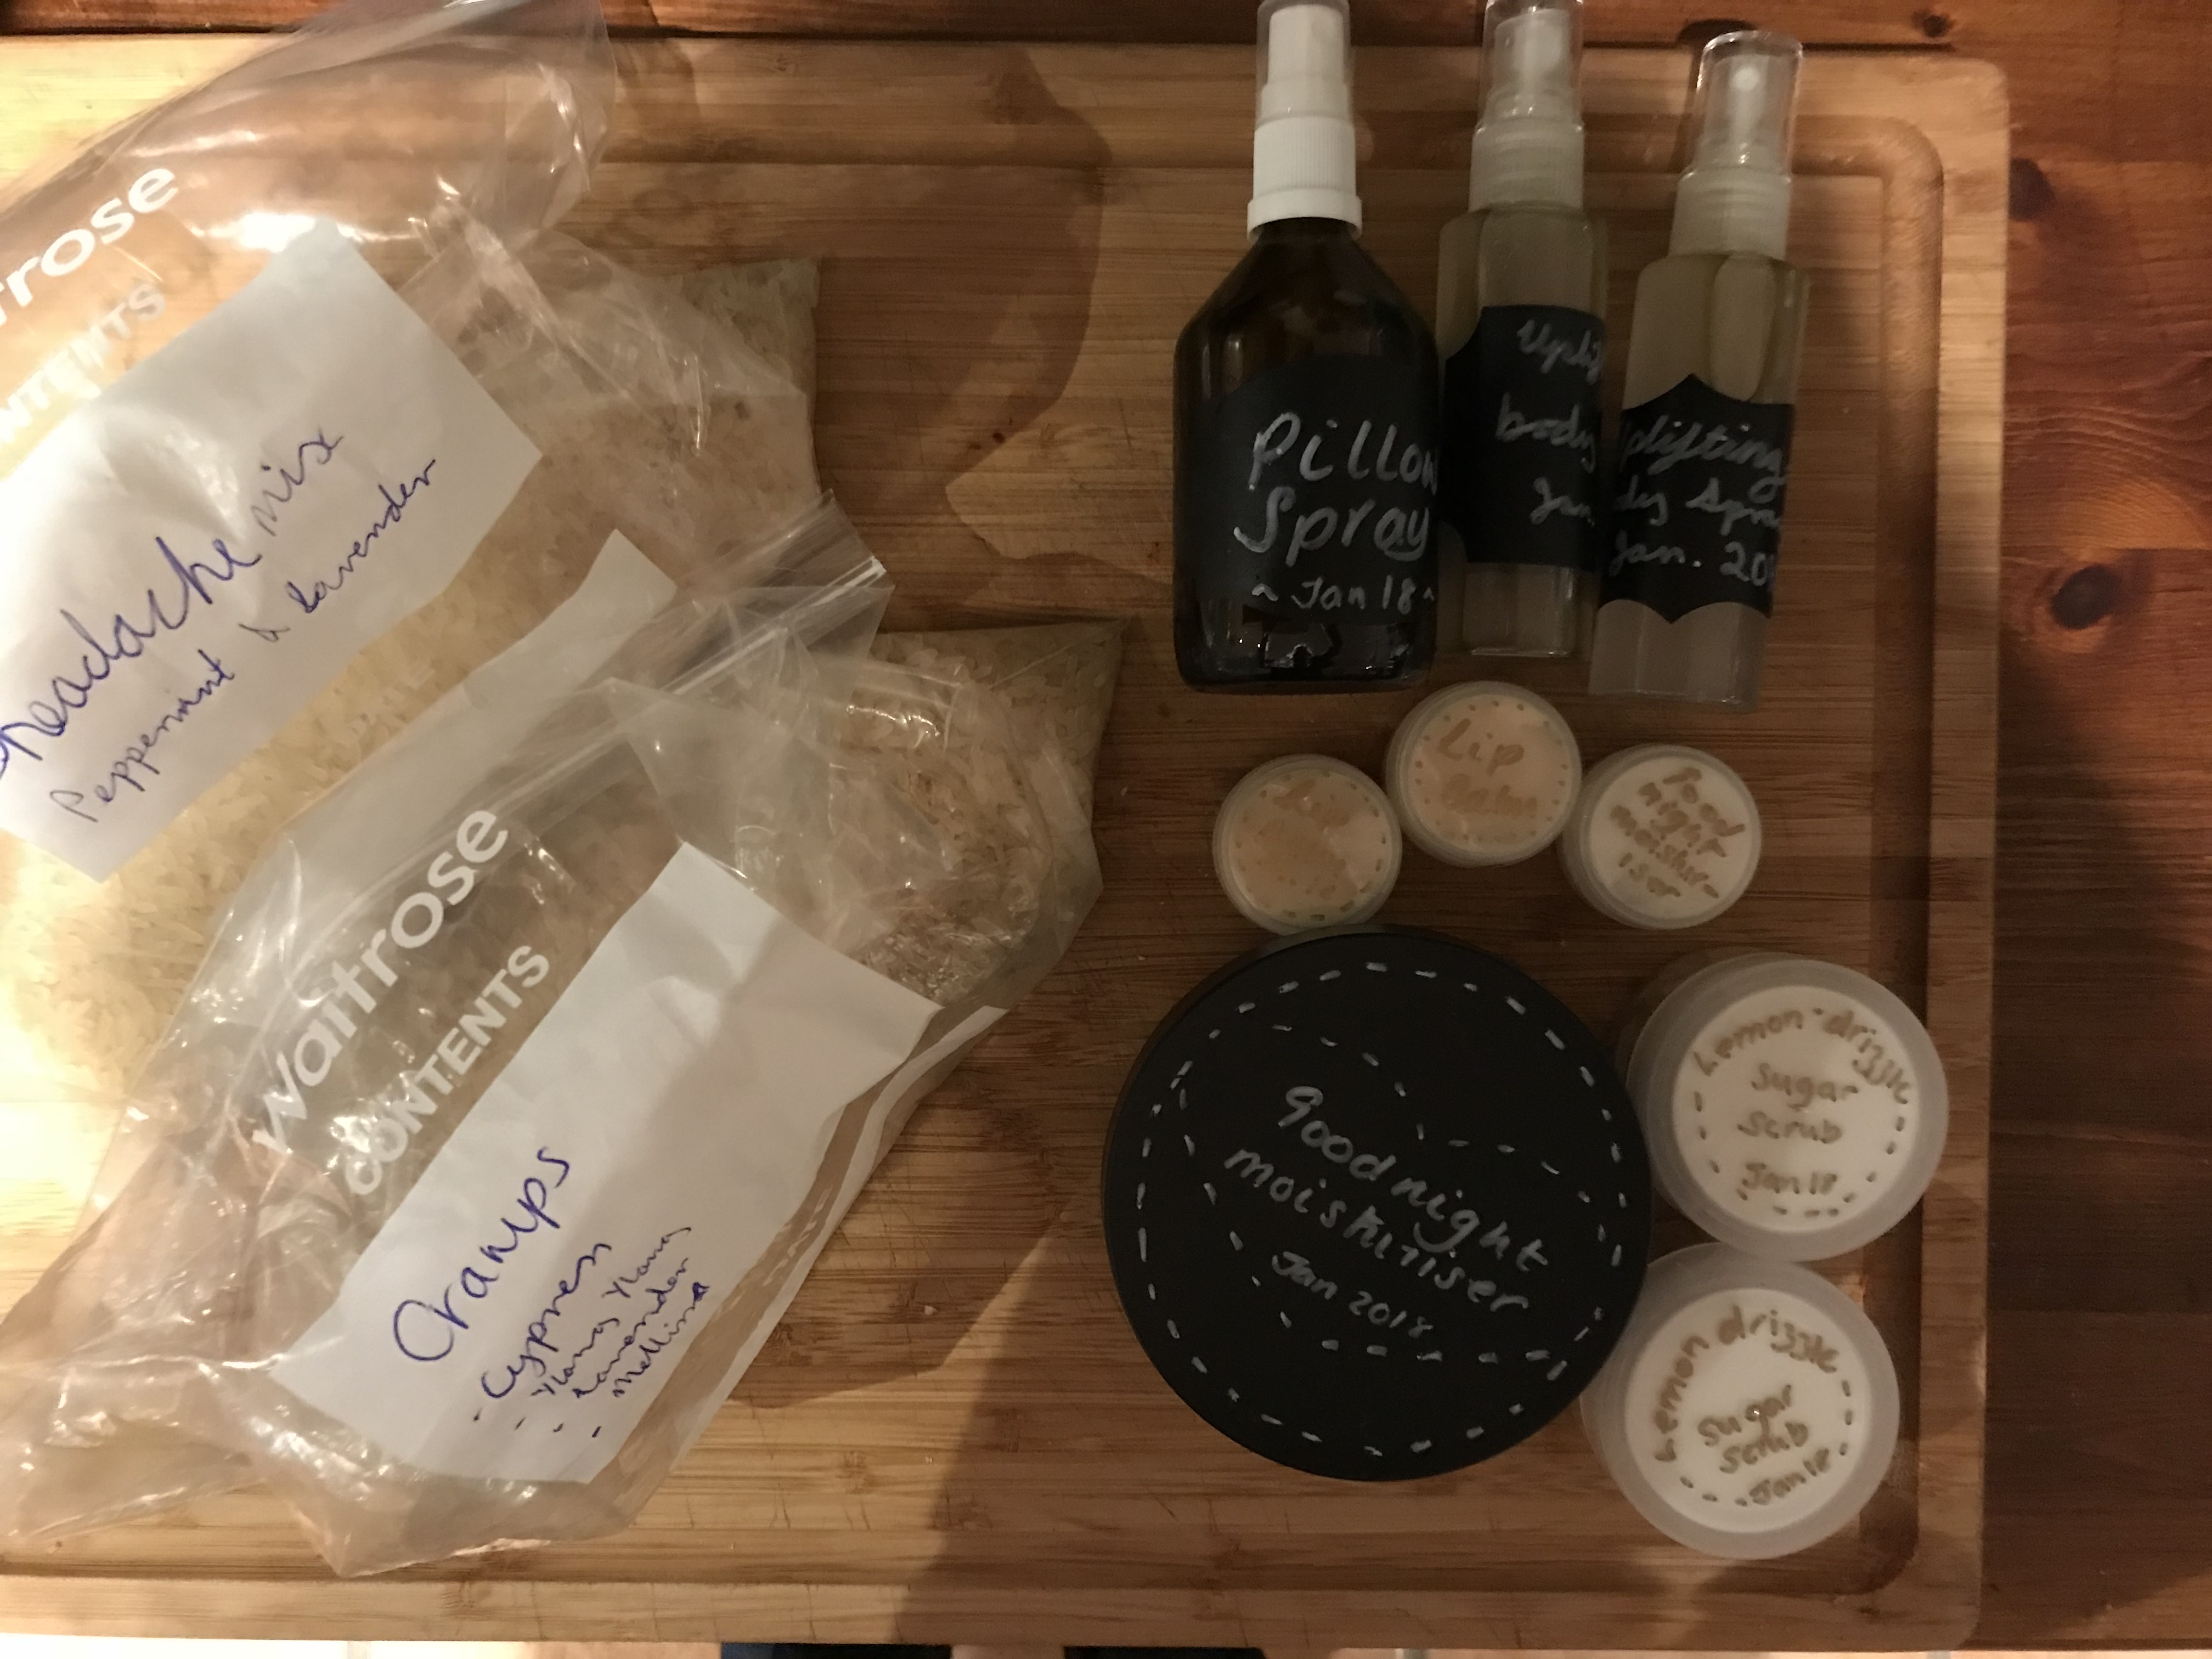
A new direction for the crafting adventure after an afternoon mixing up moisturisers, balms, sprays , scrubs and rice pads.
Anya’s mixing of essential oils makes using them extra special…
pillow spray: just 2 parts distilled water to 1 part vodka and 1 part glycerin plus relaxing essential oils in a misting bottle
Lip balm: unused old chap sticks with melted beeswax, coconut oil and essential oils in mini pots
sugar scrub: equal parts coconut oil and brown sugar with essential oils in big pots
Moisturiser: to aqueous cream add a squueze of aloe Vera gel and a little softened coconut oil with essential oils to suit
headache soother pad: 2 cups rice with 5 drops peppermint e.oil and 5 drops lavender in a cotton pouch
period pain soother pad: 4 cups rice with cypress, ylang ylang, lavender and Melissa ess. oils
uplifting body spray probably the most successful: 2 parts distilled water, 1 part glycerin, 1 part vodka then 1 drop mandarin essential oil, 4 drops sandalwood, 4 drops benzoin, 2 drops grapefruit
P.S. found this post in my drafts although we made all this a couple of months ago!
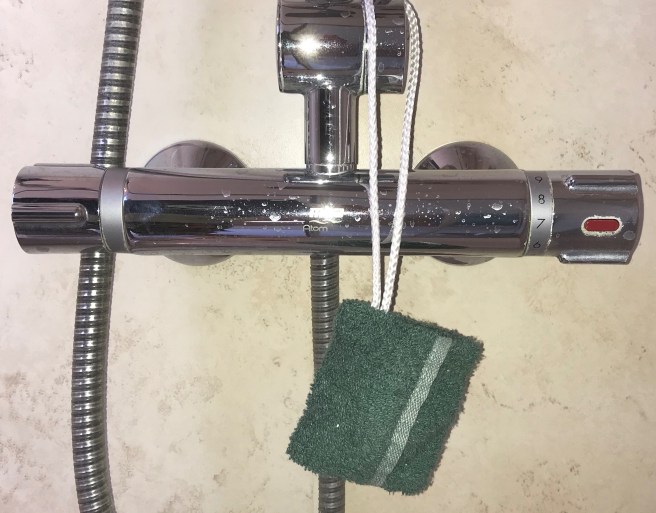
A neat way to use soaps without getting the shower scummy.
Have you lots of soaps in the house although you use shower gel these days? Here is a quick sew to help use them up…
Cut a strip of towelling (or flannel) that is two inches wider than the soap bars you have to use up and three times longer. I cut my towelling so that one edge was ready hemmed, otherwise sew a rolled hem along one width.
Now fold the towel strip in thirds and then ease the folds out to make an envelope shape just bigger than a soap bar. The hemmed edge should be inside the overlap, ready for sewing
Next cut a length of cord to form a hanging loop. Fold the cord in half with the ends sticking outside one side and pin the loop inside so it doesn’t get caught up in your seam sewing
Sew both open sides with a quarter inch seam allowance, then turn the envelope inside out so the hemmed fold is now outside and the hanging loop is showing and you have a little packet to tuck your soap bar in…
After a few showers when the soap has been dispersed and the towel is nicely soapy you can launder and/or tuck in another soap bar … you might even use up those hotel soaps you keep collecting!

 I am determined to use up some of the fabric heap. So lavender bags makes a little (very little) dent …
 when the lavender is finished I plan to make some in Christmas colours scented with cinnamon and cloves, well one day